





















In a regulated project, several questions come back at every milestone: Is the specification ready for review? Is every requirement covered? Can we show the auditor exactly what was approved? In IBM DOORS Next, a saved view helps you answer each of these questions. Built once and shared, it can be reused by the whole team at every milestone. In this article, we walk you through three views you can recreate in your own project, step by step: review readiness, coverage, audit, and export.
🔎 Start here for quick answers:
- I need to know if a module is ready for review → View 1
- I need to check requirement coverage → View 2
- I need to export or report on the approved requirements → View 3
Before we start
These views rely on the columns, views, and filter features of IBM DOORS Next. If you’re new to them, we recommend that you first consult our dedicated guide:
📖 How to Create Filters and Views in DOORS Next Modules.
Then check these few points:
-
Your IBM DOORS Next version: View 2 uses the Ancestors option, available only since IBM DOORS Next 7.1.
-
Permissions: All three views are shared views. Only administrators, or users whose role includes the required permission, can create or change them.
-
Your project’s attributes: The attribute names, link types, and values used in this article (e.g., Status, Owner, or Satisfied By) come from a sample project. Your project may use different terminology, so make sure to adapt the examples below with your own elements.
-
Your Naming Convention: Check whether your team already has rules for naming views. If not, the names suggested below use a number prefix (10,20,30, etc.) because views are listed alphabetically in the Views panel.

What are the 3 IBM DOORS Next Views You’ll Use in Almost Every Regulated Project?
View 1 – Review Readiness
Why you need it: Before a review, you need to know which requirements are still being worked on, so you can complete them first, leave them for a later review, or flag them as open points.
How to build this view:
- Right-click a column header and select Configure Columns to Display. ID and Contents are displayed by default. Add Priority, State, and even Owner (if your template has one).
- Click the Open filters icon. Add a filter on State is any of New, In Progress.
- Optional: To focus on a subset of requirements, click Add filter again and add a condition on Priority, for example, Priority is any of Low, Medium, then click Add and Close. Both conditions are combined with AND, so only the requirements that match both are displayed. Note that requirements with no priority are then hidden.
- Click Apply
Now, save your view:
- In the Views panel, click the Save as a new view icon.
- The New View dialog opens. Name the view clearly, for example, 10_REV_Readiness_SysReq, and add a description such as “Requirements still in progress before a review”.
- Save it as a Shared view, visible in All modules of this type, so every specification can be checked the same way.
- Optional: Under Who can see this view, click Change... and select the roles that need it, for example, reviewers and requirements engineers. By default, the view is visible to everyone.
- Click OK.
When to use it: Before each design review.
What you get: The list of requirements that are still New or In Progress before the review starts. The Priority column helps you decide which ones to finish first, and if you didn’t filter on Priority, an empty cell shows a requirement that still has no priority. As the list shrinks, you can see how close your module is to being ready for review.
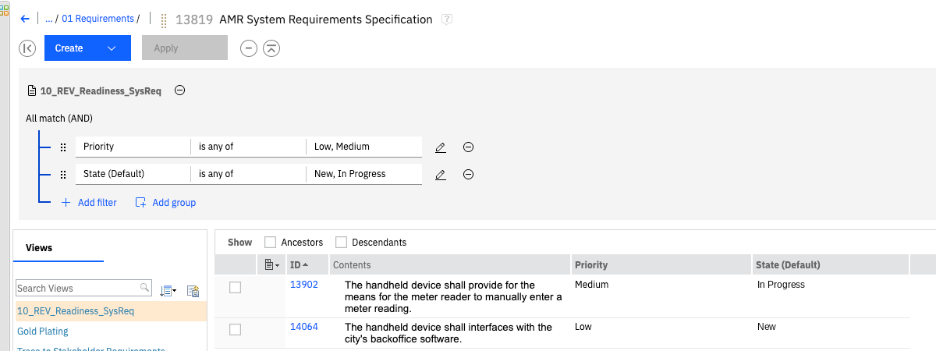
Fig. 1 – The review readiness view: the requirements still New or In Progress, filtered on Priority Low or Medium
View 2 – Requirements Coverage
Why you need it: In a regulated project, you must demonstrate that every stakeholder requirement is covered by a lower-level requirement. In DOORS Next, this coverage relies on traceability links between requirement levels, such as Satisfied By. This view displays the coverage and the gaps at a glance.
How to build this view:
- Add a link column for Satisfied By, in the same dialog as in View 1. For each linked requirement, the column shows its ID, its name, and, if available, its module.
- Filter on Artifact Type is Stakeholder Requirement
- Above the column headers, check Ancestors to keep the chapter structure of the specification visible (See Fig. 2)
- Save it as a shared view, with a clear name such as 20_COV_StakeholderReq_SatisfiedBy
- Optional: to see only the gaps, add the condition Link type does not exist Satisfied By, and save the result as a second view. Name it, for instance, 21_COV_StakeholderReq_Gaps. Only the stakeholder requirements with no downstream coverage remain. (See Fig. 3)
ℹ️ To see more information about each linked requirement, open the Change Column Display Settings dialog, select the Satisfied By column in the Columns to show list, and click Format. You can display up to five attributes of the linked artifact, for example, its Status.
When to use it: At every milestone, and before baselining.
What you get: One row per stakeholder requirement, with the system requirements that satisfy it right next to it. An empty link cell means a gap to fix. With the gaps view (step 5), you get the list of requirements to fix directly.
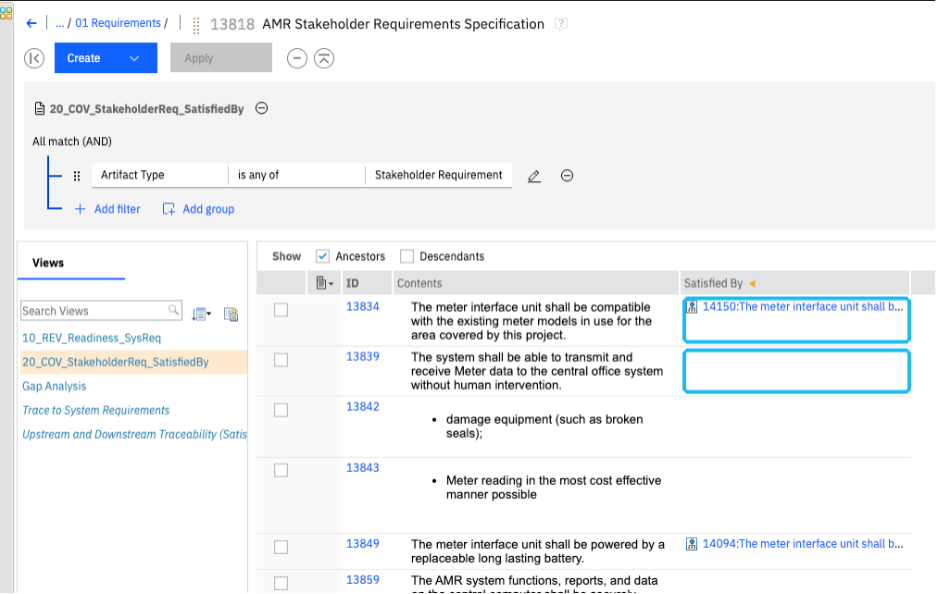
Fig. 2 – The requirements coverage view: requirement 13834 is satisfied by a system requirement, while 13839 has no Satisfied By link yet, a gap to fix
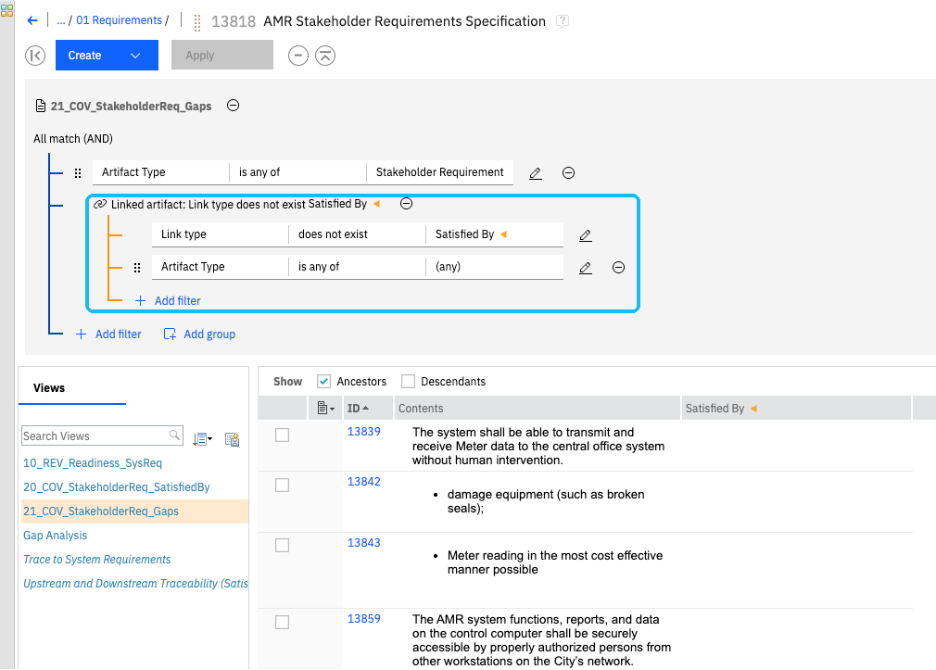
Fig. 3 – The coverage gaps view: only the stakeholder requirements with no Satisfied By link are displayed
ℹ️ We highly recommend creating one coverage view per link type (Satisfied By, Validated By…). Each view then answers one clear question and stays readable. Note that Validated By links point to test cases in another IBM ELM application. You can display them in a column, but you can’t filter on them in a project where configuration management is enabled.
📖 To learn how to create and check these links, read How to Set Up, Create and Use Traceability Links in IBM DOORS Next
View 3 – Audit and Export
Why you need it: In a design review or a certification audit, you need to present the approved requirements with the information the reviewer expects, in a format they can keep. This view gives you a good ready-to-use starting point for that evidence.
⚠️ Prepare this view before you create the baseline. In a baseline, you can add columns to a view, but only temporarily. You can’t save the changed view, and a saved view is required to export the requirements to a spreadsheet.
📖 Read more in our article Best Practices for Managing Baselines with IBM DOORS Next
How to build this view:
- In the Change Column Display Settings dialog, as in Views 1 and 2, add the attributes your auditor needs, for example, State, your safety level attribute (such as ASIL), and verification links such as Validated By. ID and Contents are displayed by default.
- Click the Open filters icon, then Add filter. Select the State of your workflow and the value Approved; for example, State (Default) is Approved, then click Add and Close, and Apply.
- Save it as a shared view, following the same steps as in View 1, with a clear name such as 30_AUD_Approved_SysReq.
When to use it: Before an audit or a certification review. Open it from the baseline that was actually reviewed, so your evidence matches the approved state.
What you can do with it: In the Views panel, hover over the view, click the menu icon next to its name, and choose:
- Export View..., to save the view’s requirements and attributes as a CSV, XLS, or XLSX file. The exported file contains the columns of the view.
- Generate Report for View..., to turn the view into a document you can hand to a reviewer or auditor (see the procedure below)
- Share Link to View..., to send a direct link to the view to your team members or the reviewer. (See Fig. 4)
To generate a report from the view:
- In the view menu, select Generate Report for View... to open the Create a Report dialog
- Choose a report type, for example, Print Module as a Table
- Name the report, for example, 30_AUD_Approved_SysReq, and choose a format: PDF, Word, HTML, or XSL-FO
- Optional: select Show Attributes to include the attribute values of each requirement
- Click Next, then Finish
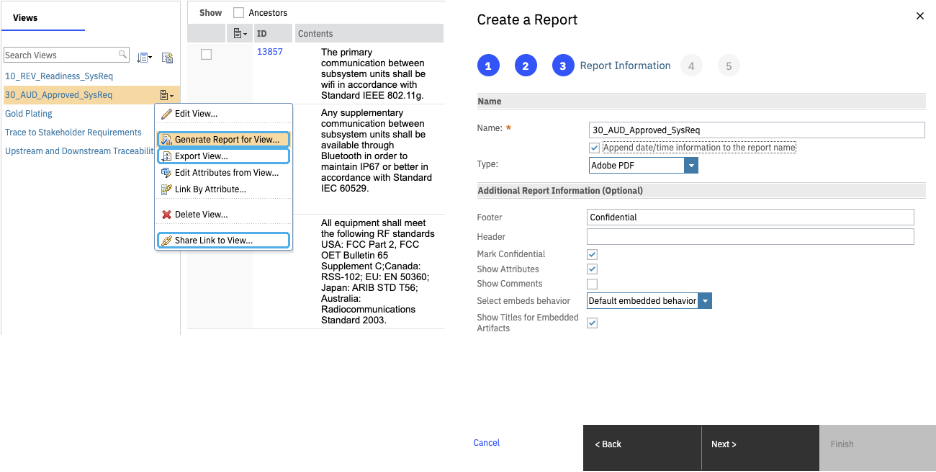
Fig. 4 – The view menu with Generate Report for View, Export View and Share Link to View (left) and the Report Information step of the Create a Report dialog (right)
Do you need to compare two versions of a module before an audit?SodiusWillert’s Compare Modules Widget automatically compares an existing module with a newer version. It identifies the requirements that are unchanged, modified, or deleted, and stores the result in a dedicated attribute.
|

Conclusion
Built once and shared, these three views help structure the key checks of a regulated project: they make them faster to run, identical from one milestone to the next, and easier to share with reviewers and auditors. The review readiness view shows what still needs work, the coverage view reveals the gaps, and the audit view exports exactly what was approved. Before rolling these views out, agree on them with your team and your DOORS Next administrator, then test them on a pilot module to check that your workflow states and link types match the filters.
➡️ Go further with our IBM DOORS Next training: hands-on exercises on views, filters, traceability, and baselines, in a real project context.

➡️ Contact our team if you have questions about views, filters, or any other topic related to IBM DOORS Next

Frequently Asked Questions
Do I need to recreate these views in every module?
No. When you save a view, select All modules of this type or All modules under Where to show this view (New View dialog). The view then appears in every matching module, including modules created later. In a project with configuration management, this applies to the current component only.
Why can’t I save changes to my view in a baseline?
A baseline is read-only. You can add columns temporarily, but you can’t save the changed view. Create and save your views in the stream before you create the baseline.
Why can’t I put list attributes such as Priority in an OR group?
In IBM DOORS Next 7.1, OR groups support basic attribute types, such as dates, but not enumerations, tags, links, or full-text filters. List attributes such as Priority are enumerations, so they can’t be used inside a Some match (OR) group.
Who can create the shared views described in this article?
Only administrators, or users whose role includes the required permission. By default, any project member can create personal views, but administrators can change this permission.
Can I export a view to Excel?
Yes. Use Export View to save the view as a CSV, XLS, or XLSX file. The file contains the columns displayed in the view.



Leave us your comment