SODIUS provides MDAccess as a way to access information in off-the-shelf applications through an Eclipse EMF interface. MDAccess is built on MDWorkbench and allows you to communicate with several modeling applications, such as System Architect, Matlab Simulink, or MS Office tools like Excel and Word. This article is a presentation of how to use this technology.
I will base my demonstration on MDAccess for Excel. This version allows you to read, modify and write Excel workbooks.
Introduction
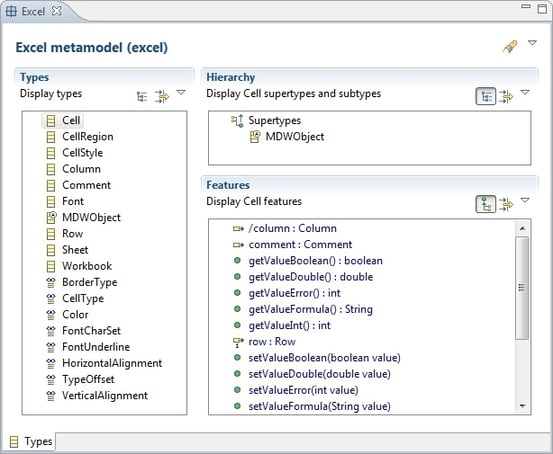
The first thing that should be done is to understand the Excel metamodel. Here is a subset of that metamodel:
An Excel model has some Sheets which contain Rows and Columns. Sheets are organized in a Workbook. Rows contains Cells (physically) and Cells are also organized by Column (logically). A Cell contains a value (String).
You can use the Metamodel Viewer in MDWorkbench to explore all the details.
Visualize the model in an editor
Let’s start by opening an Excel workbook in MDWorkbench.
Create a General Project (File -> New Project -> General -> Project) in Eclipse named “Models”.
Copy the attached “example.xls” in the project.
Here is the Excel original document:

Sheet2 and Sheet3 are empty.
Now let’s open this workbook using MDAccess:
1. Open Eclipse/MDWorkbench
2. Open the Models perspective: click Window > Open Perspective > Other… > Models
3. Open the Models view: Click Window -> Show View -> Other… -> MDWorkbench -> Models
4. In the Models view, right-click Open Model on the Excel metamodel
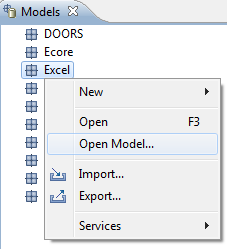
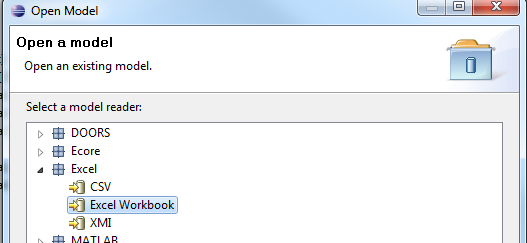
MDAccess supports several formats of workbook.
We will use the native Excel format (.xls / .xlsx):
1. Select the Excel Workbook entry.
2. Select the file example.xlsx (attached to this article)
3. Click Finish
The Excel file is opened in the MDWorkbench Model Editor.
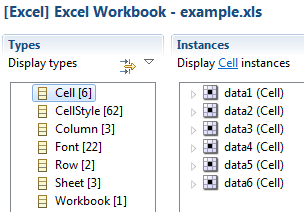
The Model Editor displays model elements grouped by types. You can also select the Containment tab, at the bottom of the editor, to display a hierarchical view of the model:

Select the Containment tab at the footer
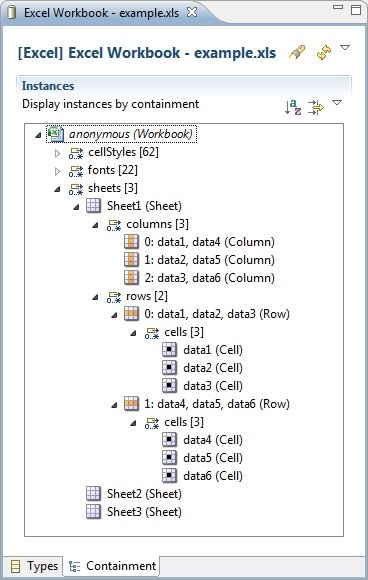
Note that the Cells are contained by a Row and are just referenced by a Column.
Use Java to read the model
Now let’s do this programmatically. Our aim is to “print” the Excel workbook in the console. In a second step, we will modify the workbook and then save it in a new location (in order to avoid a file access conflict).
1. Click File > New > Project… > Plug-in Development > Plug-in Project
2. Set “com.sodius.blogs.demo.excel” as project name and click Next
3. On next page, uncheck Generate an Activator and click Finish
4. Open the file “com.sodius.blogs.demo.excel/META-INF/MANIFEST.MF”
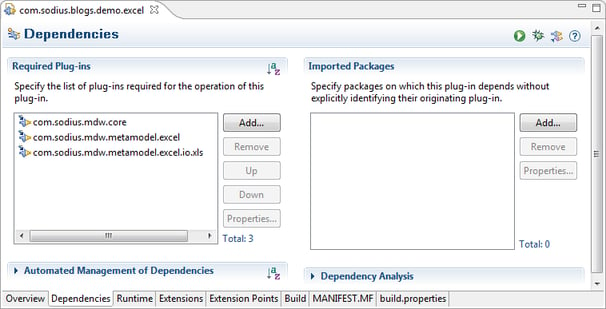
5. Select the Dependencies tab
6. Add the following plugins:
- com.sodius.mdw.core: the SODIUS infrastructure classes
- com.sodius.mdw.metamodel.excel: the Excel metamodel Java APIs
- com.sodius.mdw.metamodel.excel.io.xls: the xls/xlsx reader for Excel metamodel
Note: we create an Eclipse Plug-in project only to facilitate the configuration of the Java build path. This does not imply the Java code is dependent on Eclipse. The code can safely run in a standalone Java application.
Let’s now create a Java class:
1. Click File > New > Other… > Java > Class
2. Use this settings in the New Java Class dialog:
- Source folder: “com.sodius.blogs.demo.excel”
- Package: “com.sodius.blogs.demo.excel”
- Name: “ExploreExcelSpreadsheet”
3. Check the public static void main() option and click Finish
The main method will take two arguments:
usage: main(<input Excel path>, <output Excel path>)
The first argument is the path to the Excel example.xls, the second argument will be used in the second part of this article when we will try to modify the workbook (we will save the change in another workbook).
The first thing we have to do is to create an instance of MDWorkbench:
MDWorkbench mdw = MDWorkbenchFactory.create();
This object will allow us to retrieve declared Metamodels:
Metamodel excelMetamodel = mdw.getMetamodelManager().getMetamodel("excel");
Each metamodel has an id and also a declared reader/writer. This data is available on the property view (Window -> Show view -> Other… -> General -> Properties)
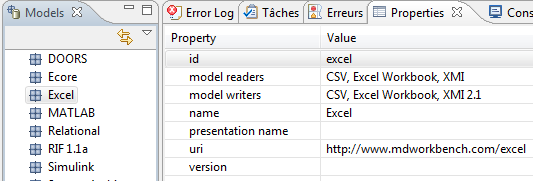
We instantiate an Excel model. An Excel model is a Model which conforms to the Metamodel definition:
Model excelModel = excelMetamodel.createModel();
Now, we will use the “Excel Workbook” reader to populate the Model:
excelModel.read("Excel Workbook", args[0]);
The workbook is loaded in the Model. We will explore this model by printing each Cell of the workbook:
// Get all the Cell in the populated model
List cells = excelModel.getInstances("Cell");
for(Cell cell : cells) {
// print Cell content and its index (row, column)
printCell(cell);
}
With:
private static void printCell(Cell cell) {
System.out.println(cell.getValue() +
" (" + cell.getRow().getRowIndex() +
", " + cell.getColumn().getColumnIndex() + ")");
}
Now we will execute the code.
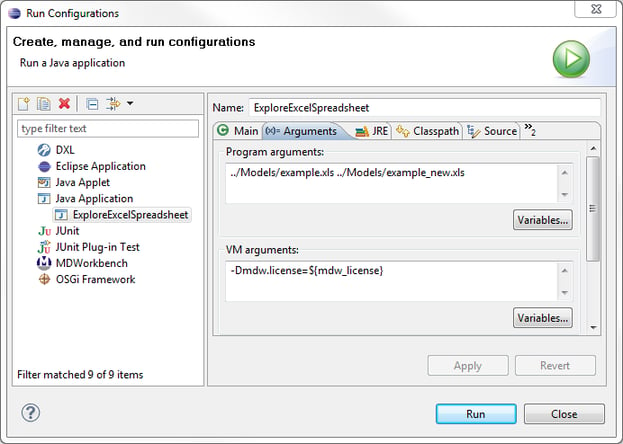
Create a Runtime configuration (Run -> Run Configuration -> Java Application -> New launch configuration).
To run MDWorkbench, we need a license, so we set a property in VM args (Arguments tab):
-Dmdw.license=${mdw_license}. This command line argument allows the run configuration to retrieve the current license of your launched IDE)
Now, we have to set the main arguments:
../Models/example.xls ../Models/example_new.xls
These arguments correspond to the input Excel path and output Excel path. Relatives paths are ok if you have created the Models project and the com.sodius.blogs.demo.excel project in the same Eclipse workspace. You can also provide absolute path if this is not the case.
Then click on Run. Console output:
data1 (0, 0)
data2 (0, 1)
data3 (0, 2)
data4 (1, 0)
data5 (1, 1)
data6 (1, 2)
We retrieved all Cells of the Excel workbook.
Note that we retrieved all the Cells using the “getInstances” method and passing in the name of its type (“Cell”). Instead of the “Cell” string, we could have also passed in its concrete declared type:
ExcelPackage.eINSTANCE.getCell()
Use Java to update a workbook
Now let’s try to modify the loaded spreadsheet. We will copy all of the Cells of Sheet1 to Sheet2, and add the “_new” suffix to the Cell’s value.
The best approach is to take a Row in Sheet1 in and then create a new Row in Sheet2 (Rows are ordered in Sheet). Cells created in the new Row will be also ordered.
First we have to get the existing “Sheet2”. We will use the “MDWList.detect(<featureName>, <featureValue>)” on the List produced by the “Model.getInstances()”.This method returns the first element in the list that matches the feature value criteria.
Sheet sheet2 = (Sheet)excelModel.getInstances("Sheet").detect("name", "Sheet2");
Then we iterate on each Row.
List rows = excelModel.getInstances(ExcelPackage.eINSTANCE.getRow());
for (Row row : rows) {
...
}
For each Row, we create a new Row in Sheet2:
Row newRow = (Row)excelModel.create("Row");
sheet2.getRows().add(newRow);
For each Cell, we create a new Cell in the new Row:
for (Cell cell : row.getCells()) {
Cell newCell = (Cell)excelModel.create("Cell");
newCell.setValue(cell.getValue() + "_new");
newRow.getCells().add(newCell);
}
Now we must save the modified Model. We will create a new file in order to keep the source document unmodified. We use the “Excel Workbook “ writer. The name of the new file is passed in as the second parameter to our class.
excelModel.write("Excel Workbook", args[1]);
Now open it with Excel:
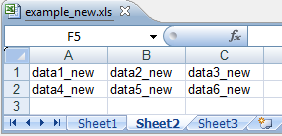
The data from the Sheet1 has been transferred and modified in Sheet2.
Conclusion
This article shows you how to easily read, modify and write Excel workbooks with MDAccess for Excel.
This technology can be useful for several purposes. For example, you could migrate old documents or specifications in a new format. Or you can create Excel reports from data coming from another application e.g. IBM Rational DOORS.
Resources
The Excel example file: example
The complete Eclipse project: com_sodius_blogs_demo_excel (File -> Import -> General -> Existing project into Workspace -> Select archive file)




Leave us your comment